Saturday, January 18GNOME IT SOLUTIONS LLC

GNOME LATEST POST

How to repair crashed mysql table in vicidial

How to repair crashed mysql table in vicidial

GNOME LATEST POST, vicidial
Vicidial mysql repair and optimization      Vicidial database often crashed due to various reasons ,which leads to improper dialing, no leads in hopper issues, agent session timeout etc. Thanks to mysqlcheck command which is used to repair and optimize the mysql tables.     you may notice below error while logging into admin or agent portal ,which alerts the mysql database has been crashed "Can't connect to local MYSQL server through socket- mysql.sock" Root cause for Vicidial Database Corrupt Below are the root causes of MYSQL database crash or corrupt. 1. Server Over Load2. Server Improper Shutdown3. Server Low Disk Space Impact of Vicidial mysql crash/corrupt 1. Agent-your session has been disab...
How to delete old call logs leads Data’s in vicidial

How to delete old call logs leads Data’s in vicidial

GNOME LATEST POST, vicidial
VICIdial is an enterprise class, open source, contact center suite in use by many large call centers around the world. VICIdial has a full featured predictive dialer.  It is capable of inbound, outbound, and blended phone call handling.  MySQL is an open-source relational database management system (RDBMS),MariaDB is a fork of the MySQL database management system.Vicidial use either mysql or mariadb as there default database software.   Steps To delete or Flush Old data    Step 1: Login to Mysql/mariadb SSH to the server using the Puttylogin to mysql by typing    mysql -p (if you dont know password try below command ) mysql -ucron -p1234    Step 2:  Select the Database Asterisk -...
Delete Local LVM and resize storage in Proxmox

Delete Local LVM and resize storage in Proxmox

GNOME LATEST POST, Proxmox
Welcome to proxmox tutorial. Here we will guide you how to delete the proxmox default local-lvm and mount the drive into the local storage Frist login into the proxmox after that select the datacenter-storage-Delete the "local-lvm" Edit the "local" and select all content LVREMOVE command Deleting a volume frees its storage back to the volume group, which can then be used to create new logical volumes or support growing an existing volume. lvremove command can be used to delete an LVM volume which we no longer intend to use. Please make sure you take a backup of the mount point in case you may want the data in it later on: lvremove /dev/pve/data LVRESIZE command lvresize is a command in Linux used to resize a Logical Volume (LV) in a Linux Logical Volume Man...
How to set automatic e-mail report and alarm VOS3000

How to set automatic e-mail report and alarm VOS3000

GNOME LATEST POST, Other Linux
1.Check mail feature:Login into your server using SSH protocol, check mail feature:/etc/init.d/postfix status If you see the picture above, it means the mail feature is working properly.Note:If the mail feature is not working properly, please contact tech support.2.VOS Client SettingSMTP Setting: In the VOS client interface, click ‹System management› → ‹System parameter›Please refer to the figure below: Go to /etc/hosts and edit the file with your domain name "Smtp domain name" info. Check the below figure 3.Automatic e-mail report setting:Step 1: In the VOS client interface, click ‹System management› → ‹System parameter›Automatically generate clearing account detail report: OnNote: The report will be generated around 1 am every day, so the next day can query today’s...
Resize Proxmox VM disks

Resize Proxmox VM disks

GNOME LATEST POST, Proxmox
1. Resizing guest disk General considerations When you resize the disk of a VM, to avoid confusion and disasters think the process like adding or removing a disk platter. If you enlarge the hard disk, once you have added the disk plate, your partition table and file system knows nothing about the new size, so you have to act inside the VM to fix it. gnome proxmox If you reduce (shrink) the hard disk, of course removing the last disk plate will probably destroy your file system and remove the data in it! So in this case it is paramount to act in the VM in advance, reducing the file system and the partition size. SystemRescueCD comes very handy for it, just add its iso as cdrom of your VM and set boot priority to CD-ROM. Shrinking disks is not supp...
Proxmox Cloud-Init OS template creation

Proxmox Cloud-Init OS template creation

GNOME LATEST POST, Proxmox
In this guide we will go over creating a Proxmox KVM Template from a Cloud Image. This same process will work for any Cloud-Init Openstack based image type you can find online. Having done a number of these for our Proxmox based VPS service I wanted to post up a guide to help anyone else looking to do the same thing. My workflow for customizing one of those for use with Proxmox with cloud-init deployment from WHMCS and root login is below. Once you setup one template you can rapidly reinstall new containers and test stuff. Setup Environment If not installed already installed you will need libguestfs-tools : apt-get install libguestfs-tools To edit the image before importing. We will use virt-edit which is a part of libguestfs-tools. For the sake of ...
Windows Server 2016/2019 Evaluation: How to extend the Trial Period

Windows Server 2016/2019 Evaluation: How to extend the Trial Period

GNOME LATEST POST, Windows
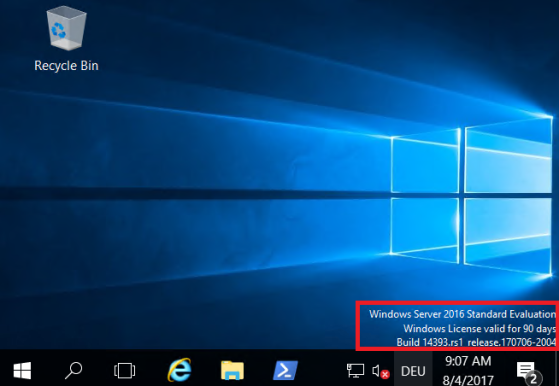
In this blog post I will show you how to extend your trial period to three years. The evaluation version of Windows Server 2012 / 2016 is valid for 180 days and you can convert your trial version to retail. To explore Windows Server 2016 or 2019 download it here: https://www.microsoft.com/en-us/evalcenter/evaluate-windows-server-2016/ https://www.microsoft.com/en-us/evalcenter/evaluate-windows-server-2019 After installing, you can try it out for 180 days. After 180 days you and your system will run into troubles for sure. But the good news is: You can extend the period to another 180 days up to 3 years. Extending the Trial Period First, take a look at your desktop. You should see the countdown in the corner down right. Or start PowerShell and run slmgr. 1sl...