Our Ceph setup guide built a fresh 3-node cluster from
scratch. This guide covers what happens next — growing that cluster as capacity or performance needs
increase. Ceph is designed for exactly this: adding disks or whole nodes to a live cluster with no
downtime and no VM disruption, which is one of Ceph’s biggest advantages over swapping in bigger
disks on a single-node RAID array.
This guide adds a fourth node to an existing 3-node Ceph cluster, contributes its disks as new OSDs, and
walks through the rebalancing process that follows.
Signs it’s time to expand
- Capacity:
ceph dfshows usage climbing past 70-75% — Ceph performs worse ”
“and risk increases as pools fill up, so plan expansion well before hitting capacity, not after - Performance: more OSDs spread I/O across more physical disks and more nodes, directly ”
“improving throughput and reducing rebuild time if a disk fails
Step 1: Add the New Node to the Proxmox Cluster First
Ceph expansion assumes the new node is already a full Proxmox cluster member — install Proxmox VE on it and join it via Datacenter → Cluster → Join (the same process from our cluster setup guide). Confirm it shows online in the cluster view before touching Ceph at all — Ceph’s own cluster membership rides on top of the Proxmox cluster network.
Step 2: Install Ceph on the New Node
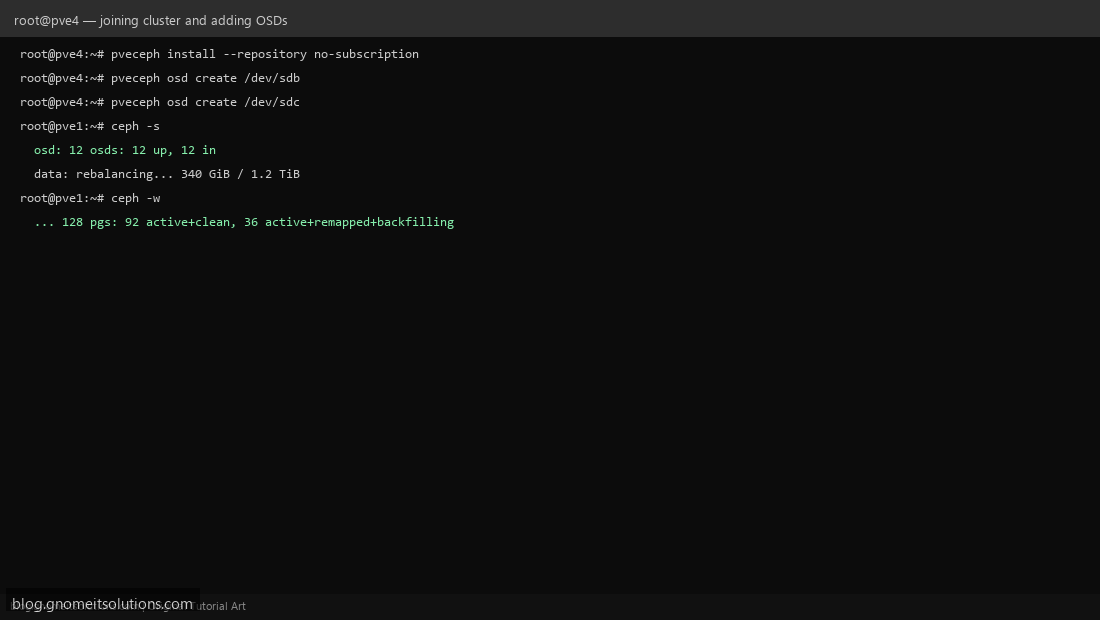
On the new node: pveceph install --repository no-subscription — identical to the initial per-node install step in our original Ceph guide. Version consistency matters here: confirm this node installs the same Ceph version as the rest of the cluster, or you’ll see health warnings about mixed versions.
Step 3: Optionally Add a Monitor on the New Node
You don’t strictly need more monitors just because you added a node, but an odd number of monitors spread across more physical hosts improves Ceph’s own quorum resilience. If you’re growing from 3 to 4+ nodes, consider adding a monitor on the new one too: Ceph → Monitor → Create, same as the original setup steps.
Step 4: Add the New Node’s Disks as OSDs
This is the actual capacity-adding step: Ceph → OSD → Create: OSD on the new node, selecting each unused raw disk. Repeat for every disk you’re contributing. The moment an OSD is created, it’s live — Ceph begins incorporating it into the existing pools immediately, no manual “go live” step needed.
Step 5: Watch the Cluster Rebalance
Run ceph -w for a live watch, or repeated ceph -s checks — you’ll see placement groups transition through active+remapped+backfilling as Ceph automatically redistributes existing data onto the new OSDs to keep the cluster balanced. This is expected and self-managing; existing VMs keep running normally throughout, though you may notice some extra background disk/network load during a large rebalance.
Step 6: Adjust Pool Settings if Needed
With more OSDs across more hosts, Ceph’s PG autoscaler (enabled by default from our original setup) will typically adjust placement group counts automatically as capacity grows. If you disabled autoscaling or want more control, check ceph osd pool autoscale-status and adjust pg_num manually only if you understand the trade-off — too many PGs per OSD wastes memory, too few limits data distribution granularity.
Step 7: Rebalance Ceph Monitors and Managers for Resilience
If you now have 4+ nodes, consider whether your monitor count and placement still make sense — 3 monitors spread across 3 different physical hosts tolerates 1 host failure; having monitors clustered on the original 3 nodes while all new capacity sits on node 4 means node 4’s disk capacity isn’t protected by a local monitor. This is a design judgment call, not a hard requirement, but worth revisiting after any significant expansion.
Step 8: Verify Health and Confirm Capacity
Once rebalancing completes (placement groups all show active+clean again), confirm ceph -s reports HEALTH_OK and ceph df shows the increased total capacity and available space you expected from the new disks. This closes the loop — expansion is complete and the cluster is back to a fully healthy, balanced state.
CLI reference
# On the new node
pveceph install --repository no-subscription
pveceph osd create /dev/sdb
pveceph osd create /dev/sdc

# Watch rebalancing
ceph -w

# Check pool autoscaling status
ceph osd pool autoscale-status

# Confirm final health and capacity
ceph -s
ceph df
Related tutorials
Image credits: All illustrations use original Proxmox VE branded artwork created
for Gnome IT Solutions — not copied from vendor marketing assets or third-party screenshots.
Tutorial text © Gnome IT Solutions.
Image credits: Screenshots are from the official
Proxmox VE documentation
(Proxmox GmbH), used under open documentation terms for educational purposes.
Tutorial text and layout © Gnome IT Solutions.