We’ve covered NFS,
ZFS, and Ceph
as shared storage options for Proxmox clusters — but a lot of existing infrastructure already has a
dedicated SAN (storage area network) appliance sitting in the rack, exporting block storage
over iSCSI. If that’s your situation, standing up Ceph or converting to NFS is unnecessary
work: Proxmox talks to iSCSI natively.
This guide connects Proxmox to an existing iSCSI target, adds it as cluster-wide storage, layers LVM on
top for proper VM disk management, and covers multipathing for link redundancy.
When iSCSI makes sense
- You already have a SAN — a Synology/QNAP NAS, a Dell/HPE SAN appliance, or a software ”
“SAN like TrueNAS already exporting LUNs - Block-level performance matters — iSCSI is generally lower-latency than NFS for the ”
“same underlying disks, since it presents raw block devices rather than a filesystem - Not a fit if you have no existing SAN and are starting from scratch — Ceph ”
f'(our Ceph guide) avoids needing separate SAN hardware ‘
“entirely
”
“
”
Step 1: Understand What the SAN Needs to Provide
Before touching Proxmox, your SAN/storage appliance needs a LUN (a block volume) already created and exported, with an access control list (or CHAP credentials) allowing your Proxmox node IPs to connect. Note the SAN’s IP address and the LUN’s IQN (iSCSI Qualified Name, e.g. iqn.2026-01.com.san:vmstore) — you’ll need both for discovery.
Step 2: Install open-iscsi and Discover the Target
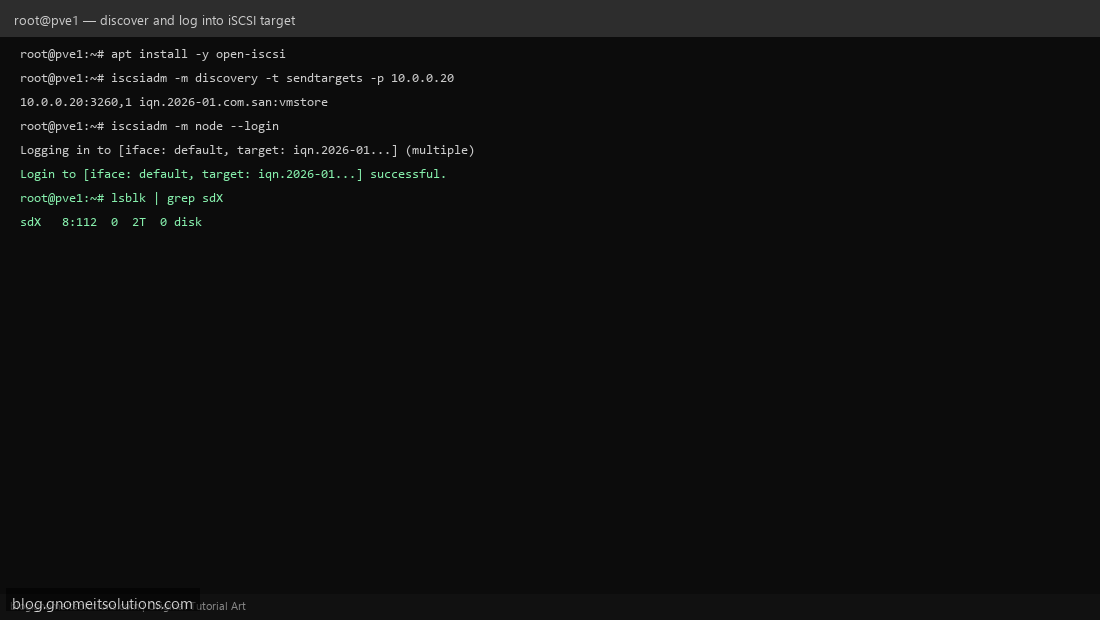
On every Proxmox node that needs access: apt install open-iscsi. Discover available targets on the SAN: iscsiadm -m discovery -t sendtargets -p SAN_IP — this returns the IQN(s) the SAN is offering, confirming network reachability and that the SAN’s access list allows this node before you go any further.
Step 3: Log Into the Target
iscsiadm -m node --login establishes the actual iSCSI session using the discovered target information. On success, the LUN appears as a new block device — confirm with lsblk. If your SAN requires CHAP authentication, set node.session.auth.authmethod, node.session.auth.username, and node.session.auth.password in /etc/iscsi/iscsid.conf before logging in.
Step 4: Add the Storage in Proxmox
Datacenter → Storage → Add → iSCSI. Give it an ID, set the Portal to the SAN’s IP, and select the discovered Target IQN from the dropdown. Enable Use LUNs directly only if you want raw block device access — for normal VM disk management, leave it unchecked and continue to the next step instead.
Step 5: Layer LVM on Top for VM Disk Management
Raw iSCSI LUNs alone don’t let Proxmox create/delete individual VM disks cleanly — add an LVM storage on top: Datacenter → Storage → Add → LVM, select the iSCSI-backed volume group as its base. This gives you the same per-VM disk granularity you’d get from local-lvm, but backed by SAN storage that every node can reach — exactly what’s needed for live migration between nodes.
Step 6: Create a VM Disk on the New Storage
Create a test VM (or edit an existing one’s disk) and select the new LVM-on-iSCSI storage as the target. Confirm the disk creates successfully and the VM boots — then, as a real test of the shared-storage benefit, try a live migration to a different node. If iSCSI is properly connected on all nodes, migration completes without needing to copy the disk, since every node already sees the same LUN.
Step 7: Set Up Multipathing for Redundancy
A single iSCSI network path is a single point of failure. If your SAN and switches support it, configure a second physical/network path and enable Linux multipath-tools (apt install multipath-tools) so the kernel presents both paths as one resilient device — a switch or NIC failure on one path doesn’t interrupt storage access. This is optional for a homelab but non-negotiable for anything production-critical.
Step 8: Troubleshoot Common Issues
Login fails immediately: check the SAN’s access control list actually includes this node’s IP or initiator IQN (/etc/iscsi/initiatorname.iscsi). Target discovered but no device appears: confirm the LUN is actually mapped to this initiator on the SAN side, not just the target being reachable. Session drops randomly: usually a network issue — dedicated VLAN for iSCSI traffic, separate from management and VM traffic, resolves most intermittent drop issues.
CLI reference
# Discover targets
iscsiadm -m discovery -t sendtargets -p SAN_IP

# Log in / out
iscsiadm -m node --login
iscsiadm -m node --logout

# Confirm the block device appeared
lsblk

# Persist login across reboot (default is usually already automatic)
iscsiadm -m node -T IQN -p SAN_IP --op update -n node.startup -v automatic
Related tutorials
Image credits: All illustrations use original Proxmox VE branded artwork created
for Gnome IT Solutions — not copied from vendor marketing assets or third-party screenshots.
Tutorial text © Gnome IT Solutions.
Image credits: Screenshots are from the official
Proxmox VE documentation
(Proxmox GmbH), used under open documentation terms for educational purposes.
Tutorial text and layout © Gnome IT Solutions.