ViciDial’s own web interface talks to Asterisk under the hood through the Asterisk Manager
Interface (AMI) — a plain-text TCP protocol for controlling and monitoring calls programmatically.
Understanding AMI directly is useful for two reasons: debugging what ViciDial itself is doing at the
Asterisk level, and building your own integrations (custom dashboards, webhooks, third-party CRM
triggers) without touching ViciDial’s core code.
This guide connects to AMI manually, runs core commands relevant to call center operations, and covers
the security basics of exposing this interface safely.
Step 1: Understand What AMI Is For
AMI is a persistent TCP connection (default port 5038) where a client sends line-based Actions (commands) and receives Responses and asynchronous Events (call state changes happening anywhere on the system). ViciDial’s own backend processes are AMI clients — everything from originating a predictive dial to updating an agent’s screen pop uses this same interface internally.
Step 2: Connect Manually for Exploration
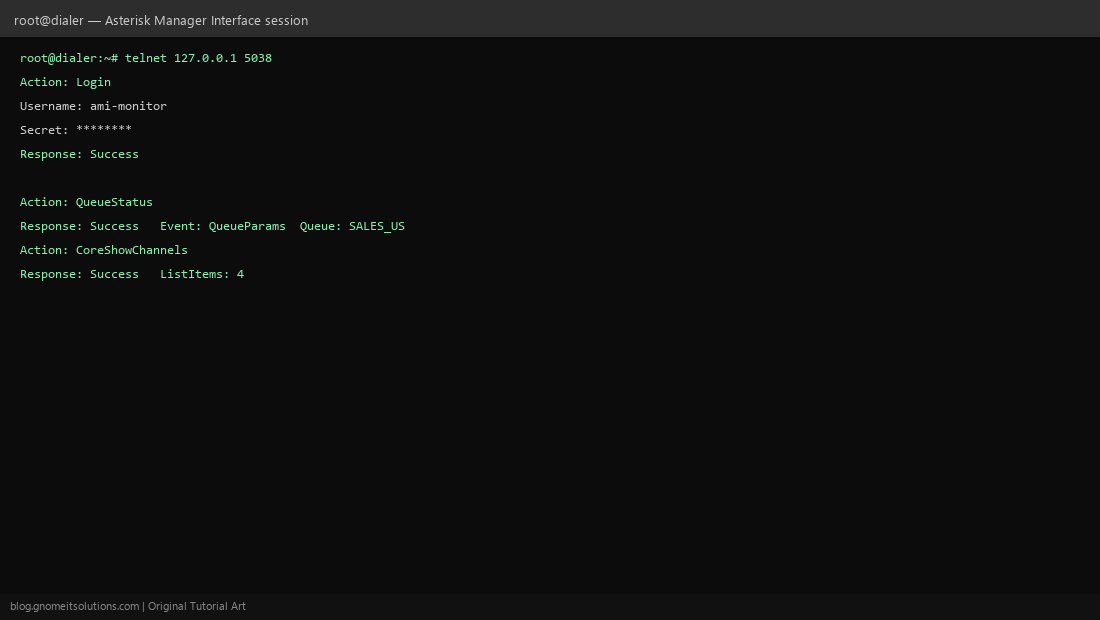
For learning and debugging, connect with a plain TCP client: telnet 127.0.0.1 5038 (or nc). Asterisk immediately sends a banner line identifying its version — confirming the manager interface is listening before you try to authenticate.
Step 3: Authenticate With a Login Action
Send a plain-text block: Action: Login, Username: your-ami-user, Secret: your-password, followed by a blank line. A successful response returns Response: Success — this user and its permission scope come from /etc/asterisk/manager.conf, not the ViciDial database, so it’s managed entirely at the Asterisk level.
Step 4: Originate and Control Calls
Action: Originate with a Channel, Context, Exten, and Priority starts a new call — this is conceptually what a predictive dialer does under the hood, minus all of ViciDial’s pacing logic on top. Action: Hangup with a Channel ends a specific active call by its channel identifier.
Step 5: Monitor Queues and Channels
Action: QueueStatus returns a stream of events describing every queue’s current state — waiting callers, member agents, and their status. Action: CoreShowChannels lists every active channel on the system right now, useful as a sanity check against what ViciDial’s own real-time screens are reporting (see our real-time reports guide) when you suspect the two might be out of sync.
Step 6: Build a Custom Integration on AMI Events
Beyond one-off Actions, a persistent AMI connection streams Events continuously — a new call starting, an agent’s status changing, a call ending with a hangup cause. A custom script that stays connected and reacts to these events (a Python client using a library like asterisk-ami, or a simple socket loop) can trigger webhooks into a CRM, log custom metrics, or drive a dashboard ViciDial’s own UI doesn’t provide.
Step 7: Restrict manager.conf Permissions
AMI access is powerful — an authenticated user can originate calls and read live call data across the whole system. In /etc/asterisk/manager.conf, create dedicated users per integration with the narrowest read/write class permissions each actually needs (e.g. read = call,agent for a monitoring-only integration, no write permission at all), and restrict the interface to 127.0.0.1 or a trusted internal network with deny=0.0.0.0/0.0.0.0 plus a specific permit= line.
Step 8: Avoid Common Pitfalls
A client that authenticates but never explicitly requests Events: off receives every single event on the system by default — fine for a small system, but a flood on a busy multi-tenant dialer if your integration only cares about one specific event type. Always send a clean Action: Logoff when your client disconnects intentionally, rather than just closing the socket, so Asterisk doesn’t hold the session open waiting for a timeout.
Quick reference
Action: Login
Username: ami-monitor
Secret: yourpassword

Action: QueueStatus

Action: CoreShowChannels

Action: Originate
Channel: SIP/8600051
Context: default
Exten: 8600051
Priority: 1

Action: Logoff
Related tutorials
Image credits: All illustrations are original terminal/config mockups created for
Gnome IT Solutions — not screenshots from any third-party site. Tutorial text © Gnome IT Solutions.