Manually importing a CSV of leads works for a batch upload, but most real integrations — a web form,
a CRM, a lead marketplace feed — need to push leads into ViciDial the moment they arrive, and sometimes
trigger an immediate call. ViciDial’s Non-Agent API is a plain HTTP GET/POST interface
(distinct from the Asterisk AMI covered in another guide on this blog) purpose-built for exactly this: an
external system calling into ViciDial to add leads or trigger dials, without needing an agent logged in or
any Asterisk-level access.
This guide covers enabling the API, authenticating, injecting a lead, checking for duplicates first, and
triggering a call — plus the security basics for exposing this endpoint safely.
Step 1: Understand What the Non-Agent API Covers
The Non-Agent API is an HTTP script (commonly agc/api.php or non_agent_api.php depending on version) accepting URL parameters that specify a function — add_lead, update_lead, external_dial, and others — each mapping to an action ViciDial’s own database/dialer layer would otherwise perform through the admin UI or agent screen.
Step 2: Locate and Enable the API Script
Confirm the Non-Agent API script is present in your ViciDial web root and that your server’s PHP configuration allows it to run — some installs disable or restrict it by default since it’s a powerful, unauthenticated-by-default entry point until you configure credentials. Check your ViciDial version’s documentation for the exact script path, since this has moved between major versions.
Step 3: Authenticate Requests
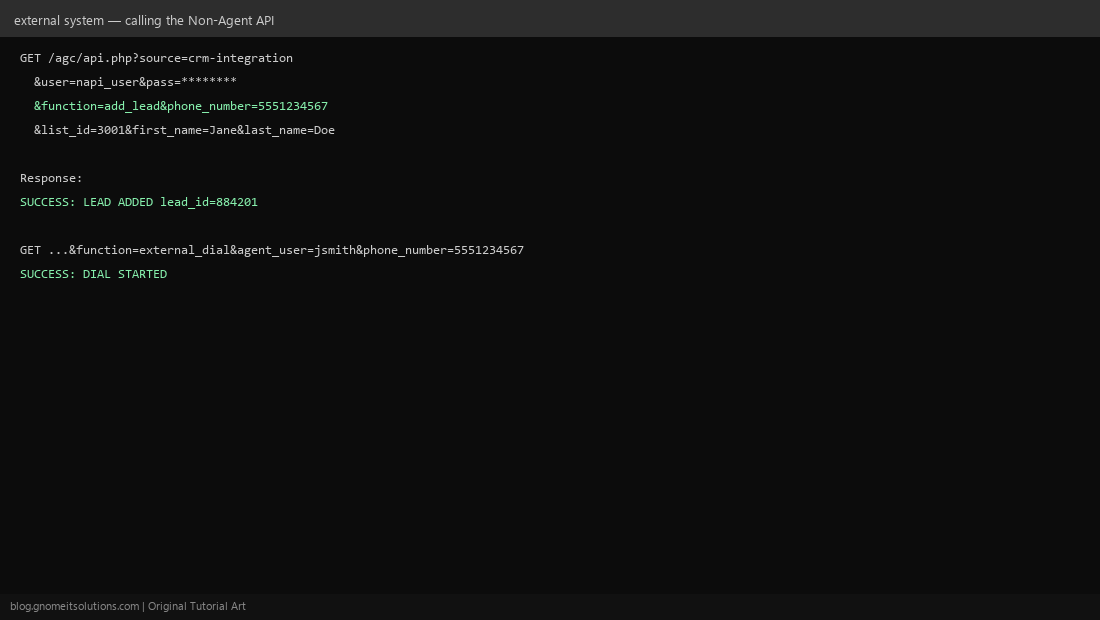
Every API call passes user and pass parameters corresponding to a ViciDial user account — create a dedicated API user for this purpose rather than reusing an admin or agent login, so its activity is distinguishable in logs and its access can be revoked independently. That user needs the appropriate permission flag enabled on its profile to actually use the API.
Step 4: Inject a Lead
A basic add_lead call passes function=add_lead, the target list_id, and lead fields like phone_number, first_name, last_name. A successful call returns a plain text response confirming success and the new lead’s ID — parse this response in your integration code to confirm the insert actually worked rather than assuming a 200 HTTP status alone means success.
Step 5: Check for Duplicates Before Inserting
Before calling add_lead, consider calling a duplicate-check function first (or set the API call’s duplicate-checking parameter, if your version supports it inline) — blindly inserting the same phone number repeatedly from a retried webhook or a flaky upstream feed pollutes your lead lists and can result in the same person being called multiple times unnecessarily.
Step 6: Trigger an Outbound Call
The external_dial (or similarly named, version-dependent) function lets an external system trigger an immediate call to a specific number through a specific logged-in agent — the click-to-call pattern used by CRM integrations where clicking a contact’s phone number in another system initiates the call through ViciDial.
Step 7: Handle Responses and Errors
The API returns plain text starting with SUCCESS or ERROR followed by a description — always check for the ERROR prefix in your integration rather than only checking HTTP status codes, since a malformed request or bad credential typically still returns HTTP 200 with an error message in the body.
Step 8: Secure the API Endpoint
This endpoint can insert data and trigger calls — treat it like any other authenticated write API. Restrict access at the web server or firewall level to known source IPs (your CRM’s server, not the open internet), always call it over HTTPS so credentials aren’t sent in plaintext, and use a dedicated low-privilege API user rather than an admin account, following the same least-privilege pattern as our Proxmox API tokens guide.
Quick reference
GET /agc/api.php
  ?source=crm-integration
  &user=napi_user&pass=SECRET
  &function=add_lead
  &phone_number=5551234567
  &list_id=3001
  &first_name=Jane&last_name=Doe
Related tutorials
Image credits: All illustrations are original terminal/config mockups created for
Gnome IT Solutions — not screenshots from any third-party site. Tutorial text © Gnome IT Solutions.